The history
- Had an older Netgear R2600 with 10/100mb ethernet ports.
- Got a 1Gb fiber line installed.
The Problem
I was seeing 80-90mb up & down and getting 50-80% packet loss.

So I figured it was my router, which it ultimately was, but before finding that out I tried to bypass it and saw the same 80-90mb up & down and packet loss. Before calling the help desk I switched out my old Netgear router with a new R2S from FriendlyElec with dual gigabit ethernet ports, to no avale.
The Solution: IT help Desk
So around noon I gave my ISP help desk a call. We chated for about 75min. durring which time he tought me a few new cli commands but never got the problem fixed. That is untill about 15min after the call ended, more on that in a bit.
Mii-tool
After pugging and unpluging, testing diffrent cable and componet combinations we found that my laptop was only running at Half Duplex or 100baseTx-HD. To explain the 80% packet loss Mr. Helpdesk said that the inbound connection was flooding my laptop port and it was the laptop dropping packets. So after double checking the specs on my Acer V5 and finding I had a 1gb ethernet port Mr. Helpdesk mentioned the mii-tool.
$ sudo mii-tool <interface ID>
enp2s0f0: 100 Mbit, half duplex, link ok
Ouch my 1000mb ethernet port was only running at 100Mb. Not good.
$ sudo mii-tool -r <interface ID>
restarting autonegotiation...
$ sudo mii-tool enp2s0f0
enp2s0f0: negotiated 1000baseT-FD flow-control, link ok
BINGO!!! Now my ethernet port is up to Full Duplex (FD). One problem solved, but only temperaraly.
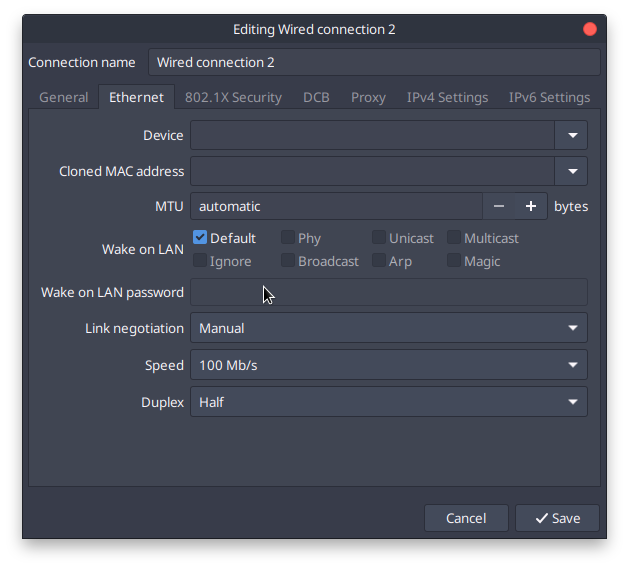
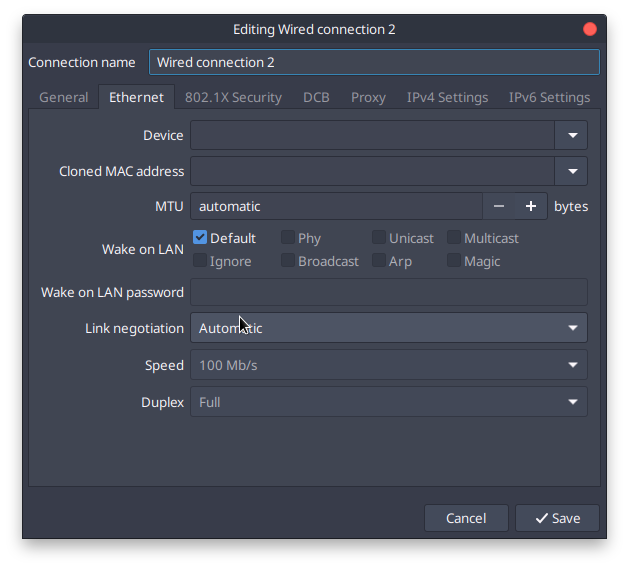
Finding your defaults nm-connection-editor
If you have nm-connection-editor, a gnome gui interface that can be started from the commandline, if not try some of these other tools.
nm-connection-editor

Change Link Negotiation to Automatic

Now each time you plug in to a new device your Ethernet adapter with automatically negotiate the best connection.
Finding your <interface ID>
To look at what interfaces / NIC’s you have run ifconfig or ip a among others. I like how ifconfig displays the results in a nicely formatted output.
$  ifconfig
enp2s0f0: flags=4099<UP,BROADCAST,MULTICAST>  mtu 1500
        ether **:**:**:**:**:**  txqueuelen 1000  (Ethernet)
        RX packets 3537788  bytes 3771183827 (3.5 GiB)
        RX errors 118775  dropped 0  overruns 0  frame 58628
        TX packets 3563116  bytes 4103343460 (3.8 GiB)
        TX errors 2985  dropped 0 overruns 0  carrier 2985  collisions 55888
        device interrupt 16

...

wlp3s0: flags=4099<UP,BROADCAST,MULTICAST>  mtu 1500
        ether **:**:**:**:**:**  txqueuelen 1000  (Ethernet)
        RX packets 190035  bytes 99639820 (95.0 MiB)
        RX errors 0  dropped 0  overruns 0  frame 0
        TX packets 188036  bytes 37123233 (35.4 MiB)
        TX errors 0  dropped 0 overruns 0  carrier 0  collisions 0
So the fist column is the <interface ID> used with the mii-tool and tcpdump
Problem still persists
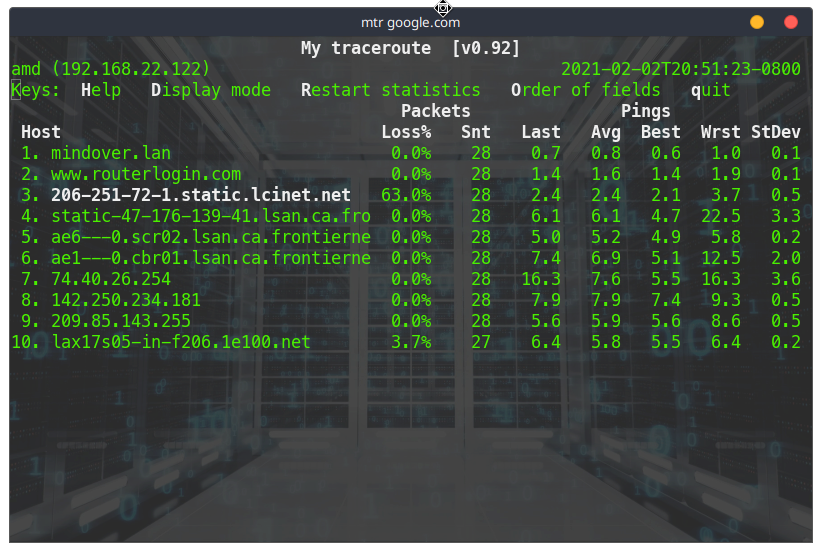
Even after fixing the Ethernet port on my laptop and him confirming that he was seeing Full Duplex connection from his end we were still getting 60-80% packet loss. I have my suspicions but I believe they set their bridge to half-duplex in order to get it to play nice with the old Netgear, but he would not confirm that. So net we ran the tcpdump combined with either ping or mtr.
Tcpdump with Ping or MTR
Tcpdump was another new cli command for me, it will display each packet set and received through an interface to an ip address.
$ sudo tcpdump -i <interface ID> -n host 8.8.8.8
[sudo] password for userA:
dropped privs to tcpdump
tcpdump: verbose output suppressed, use -v or -vv for full protocol decode
listening on enp2s0f0, link-type EN10MB (Ethernet), capture size 262144 bytes
After getting tcpdump up and running you have to start communication with the ip, in this case 8.8.8.8
$ ping 8.8.8.8
PING 8.8.8.8 (8.8.8.8) 56(84) bytes of data.
64 bytes from 8.8.8.8: icmp_seq=1 ttl=120 time=6.04 ms
...
--- 8.8.8.8 ping statistics ---
6 packets transmitted, 6 received, 0% packet loss, time 5005ms
rtt min/avg/max/mdev = 5.800/5.957/6.079/0.089 ms
Then tcpdump will start displaying packet details.
...
01:02:37.806958 IP 192.168.43.212 > 8.8.8.8: ICMP echo request, id 26, seq 9, length 64
01:02:37.849647 IP 8.8.8.8 > 192.168.43.212: ICMP echo reply, id 26, seq 9, length 64
01:02:38.812937 IP 192.168.43.212 > 8.8.8.8: ICMP echo request, id 26, seq 10, length 64
01:02:38.842629 IP 8.8.8.8 > 192.168.43.212: ICMP echo reply, id 26, seq 10, length 64
...
Notice that after each request there is a reply. This is how it should be. Next we will see what mtr looks like with tcpdump.
Use
CTRL+Cto closeping
$ mtr 8.8.8.8
...
Head back to the tcpdump screen and see what is happening.
01:02:37.806958 IP 192.168.43.212 > 8.8.8.8: ICMP echo request, id 26, seq 9, length 64
01:02:37.806958 IP 192.168.43.212 > 8.8.8.8: ICMP echo request, id 26, seq 9, length 64
01:02:37.806958 IP 192.168.43.212 > 8.8.8.8: ICMP echo request, id 26, seq 9, length 64
01:02:37.806958 IP 192.168.43.212 > 8.8.8.8: ICMP echo request, id 26, seq 9, length 64
01:02:37.806958 IP 192.168.43.212 > 8.8.8.8: ICMP echo request, id 26, seq 9, length 64
01:02:39.963788 IP 8.8.8.8 > 192.168.43.212: ICMP echo reply, id 26, seq 11, length 64
01:02:37.806958 IP 192.168.43.212 > 8.8.8.8: ICMP echo request, id 26, seq 9, length 64
01:02:37.806958 IP 192.168.43.212 > 8.8.8.8: ICMP echo request, id 26, seq 9, length 64
01:02:37.806958 IP 192.168.43.212 > 8.8.8.8: ICMP echo request, id 26, seq 9, length 64
01:02:37.806958 IP 192.168.43.212 > 8.8.8.8: ICMP echo request, id 26, seq 9, length 64
01:02:37.806958 IP 192.168.43.212 > 8.8.8.8: ICMP echo request, id 26, seq 9, length 64
01:02:39.963788 IP 8.8.8.8 > 192.168.43.212: ICMP echo reply, id 26, seq 11, length 64
As you can see there are lots pf request’s with only a few reply’s.
The Final Fix???
Well sorry to say I’m not sure how the overall problem of the pack loss was fixed. I will continue to inquire and update this post soon!!!
Tools used in this adventure
tcp-dumppingmtrnm-connectionmii-tool


Comments are closed